
Ultrasound 101 - Part 4: Depth and focus

Welcome to Ultrasound 101. In this 12-part series, we will talk about the basic principles of medical ultrasound, the equipment you will use, the settings on your machine, and of course, how to use sonography in your patients. Each part will focus on a specific topic and allow you to experiment with the scanner, adjust the settings on your machine, and get the best out of your ultrasound examination.
What we learned so far
The first three parts were all about the imaging hardware - we talked about different types of transducers, how to orient yourself and your transducer, and what movements you can do to get the image you want. Now it’s time to talk about image settings and some of the knobs on your scanner, and we will begin with depth and focus. So let's get started!
How deep do you want to image?
Imaging depth does exactly what it sounds like - it describes how far into the body you can look with your ultrasound machine. It is measured in centimeters and starts at the surface of the transducer, which is usually resting on the patient's skin. Different transducers allow for different penetration depths, depending on the frequency they emit (see part 1 for details). And like with imaging frequency, your desired imaging depth is different from case to case and structure to structure: If you do vascular ultrasound, for example, you usually look at arteries and veins that are rather superficial in the patient’s body. Depending on the habitus of the patient and the vessel in question, you usually want a depth of only a few centimeters.
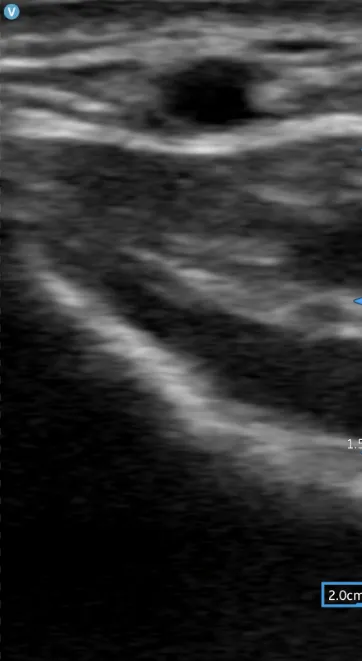
Here is an image of the radial artery - you can see it as the black circle at the top of the picture. This was taken with a point of care device, and you can see that the maximum depth of the image is only 2cm - usually, you can’t decrease depth much further than that.
Imaging scenarios
On the other hand, if you are doing abdominal ultrasound and want to look at the aorta, you will need much more depth. Even in very thin individuals, you will probably need about 8 to 10 centimeters here, and up to 25 or 30 cm in obese patients. And then, there are large structures you might want to display, like the heart, the liver, or the kidney. For example, while the apex of the heart lies quite close to the skin and can usually be seen in 2 to 3 centimeters of penetration depth, you will most likely not just want to image the apex but the whole heart - meaning, you will usually need somewhere between 15 and 20 centimeters depth for echocardiography, and it is pretty similar with the liver.
This is an image of the liver, and you can also see a bit of the right kidney adjacent to it. According to the mark on the top right, the maximum depth is 15cm.
Take a look at the following image of the urinary bladder and the Proust cavity. Pay attention to the scale on the left edge, showing the imaging depth in 1-centimeter markings. At the top right of the screen, your system tells you the depth of the bottommost marking. Also, note how details at the bottom edge of the screen are harder to see than at the top.
This image shows all the necessary details. You can see the urinary bladder, the rectum behind it, and the absence of free fluid around the bladder and the rectum. The area of interest is a little above the bottom edge of the screen.
Target plus one
Now that you know and understand why you should not crank your depth setting all the way up, how should you actually set it? There’s a simple principle I learned when starting to image, and that principle says “target plus one” - so what you want to do is, turn your depth up or down until you see everything you want to see (e.g., the whole organ), and add one centimeter to the bottom of the screen. This ensures that you really see the entire area of interest and can also make out its borders, but do not waste computing power (your own and your machine’s). Seeing surrounding structures is often important or at least interesting in ultrasound, as it is in the following image:
You might know this view from placing central lines - the large, black structure in the middle is the jugular vein. It is crucial you see enough space behind it, so you can track your needle in case you get too deep and also so you can see and identify surrounding structures like the carotid artery (in this case, it can be seen at 8 o’clock of the vein) not to injure them. Image quality is a little worse than in the images before, as this was taken with a handheld, also called point of care, device.
How to set the focus
After depth, there is one more thing I want to bring your attention to, and that is the focus point. Most modern scanners automatically set the focus point and usually do a good job. The focus should lie at or just below (deep to) the structure you want to investigate, and is traditionally marked by a small triangle at the edge of the image, right next to the depth scale. The focus tells your scanner where the essential part of the image lies and which area you want the best resolution in. To be honest, in clinical practice, this mostly plays a role when imaging really small structures, like nerves and vessels, especially vessel walls. You will hardly think to adjust the focus when looking at the liver or kidney.
Your turn
So this concludes today's part, and I hope you have a better understanding now of why it is essential to choose the proper imaging depth and how to do it. It is now time for you to get back to your scanner and try different settings of depths and focus. Next time, we will talk about the second most important knob on your machine: gain and time gain compensation. Until then, enjoy imaging!